There are many useful functions for tracking progress and reviewing results other than described in the basic usage page. This page introduces useful features related to tracking and reviewing.
1. Useful functions for tracking
1.1. Automatic arrival detection
1.2. Notification to lock screen
1.3. Modify recorded time
1.4. Progress on current location
1.5. Setting for time difference
1.6. Save point information as image
1.7. Weather forecast
2. Useful functions for reviewing
2.1. Modify result
2.2. Others
1.1. Automatic arrival detection
1.2. Notification to lock screen
1.3. Modify recorded time
1.4. Progress on current location
1.5. Setting for time difference
1.6. Save point information as image
1.7. Weather forecast
2. Useful functions for reviewing
2.1. Modify result
2.2. Others
===================================================
1. Useful functions for tracking
1.1. Automatic arrival detection
If the GPS position information of the point is set, the automatic arrival detection function can be used. When the GPS point is approached to a certain distance, it will be judged as arriving and the arrival will be recorded automatically.This is a plan screen. If GPS information is set, the pin icon will be displayed in green. In this state, the "automatic arrival detection" switch is displayed.

If automatic detection is ON, automatic detection of arrival will start automatically when you depart from the previous point. If you do not want to use the automatic arrival detection function, you can turn it off. In this case, you will need to manually record on arrival.


It is possible to stop the automatic detection during it working. Also, automatic detection can be resumed and manual recording can be performed. To stop, tap the "STOP" button.
Arrival recording is automatically performed when the distance to the GPS point of the point is less than a certain distance. The detection judgment distance can be specified on the setting screen and is 75m or 150m. The default is 75m.
As soon as arrival is recorded by the automatic arrival detection, the automatic departure detection will be activated. Therefore, if GPS position information is set at all points, all arrivals and departures will be recorded automatically, just by start tracking in start point.
If GPS information cannot be obtained due to geographical conditions, automatic detection may not work properly. Check the condition at an appropriate time and check if the expected stamping is performed.
<Battery consumption for automatic detection>
Automatic detection consumes battery power because it is based on the GPS information of your current location. "Automatic departure detection" consume battery in same level with other general GPS application. "Automatic arrival detection" consume lower power than departure detection.
The time during which the automatic departure detection is working can be regarded as the time staying on the PC. The effect is small if you stay for several tens of minutes, but if it takes several hours to take a nap or stay overnight, it is better to stop the automatic detection once and restart the automatic detection again at the timing when you start running. You can suppress the influence on battery consume.
For automatic arrival detection, the operating time depends on the distance between the points and can last for several hours. If you want to use fully from the start to the finish, the detection function will be worked all the time while on the Brevet. Therefore, it is necessary to be aware of the remaining battery level in order to work the automatic arrival detection.
Considering the apps that run at the same time, it is recommended to prepare equipment for additional charging when engraving with full auto.
1.2. Notification to lock screen
Whether you departure or arrive, you will be notified when it is detected. A notification is also displayed on the lock screen, so you can check that automatic detection is working without opening the app screen.

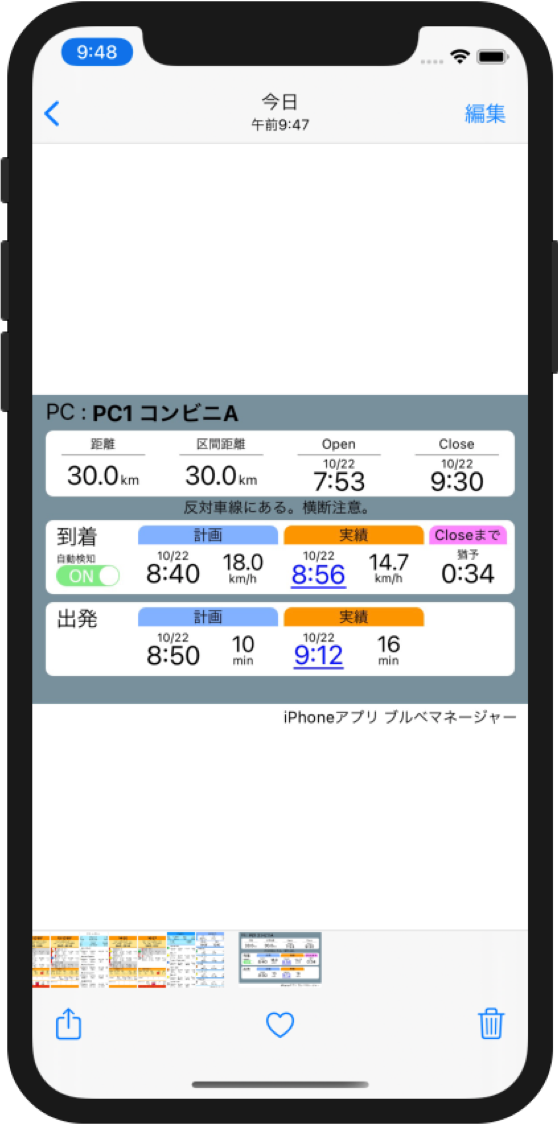
1.3. Modify recorded time
Recording arrival / departure times is mainly a simple operation of tapping the record button, but even if the recording timing is off or forgotten, you can record and correct it later.
The recorded time is displayed as blue link text. You can correct the input time by tapping this link text.


1.4. Progress on current location
You can also check the progress for convenience at any point that is not in the plan. Here, we will check the progress at the 55km point, which is not in the plan. Tap the "?" icon button to the right of the time at the top of the screen.

If the track file is loaded, the current location distance will be calculated from the GPS information. If it is not loaded, enter current route distance manually. The planned arrival time and Close time at the 55km point are calculated and the difference from the plan is displayed. The planned arrival time is calculated from the actual time and planned speed of the points before and after.

You can check the difference from the plan when you are worried about the Close time or when you take a break in an unplanned place.


The display of the plan ratio has been changed to the display of the grace time until the Close time. If there is time until the Close time, it is expressed as "Remaining", and if it is over, it is expressed as "Delayed".
The time "difference from the plan" is calculated for both arrival / departure of points, but the "Remaining time to the Close" is calculated only for the arrival time. This is an effective display method when driving with the Close time in mind. Immediately after executing the plan, you can specify which time difference to display on the setting screen.


1.5. Setting for time difference
By default, the time "Difference time from the plan" is displayed as "Ahead / Delay". You can change the display of this time to "Remaining time to the Close".
At the top of the screen, the planned ratio at the last stamped place is displayed, and in each point information, the time difference between the planned time and the actual time is displayed.

Display the menu and tap "Setting for time difference".

Select "Remaining time to the Close" from the two display methods.


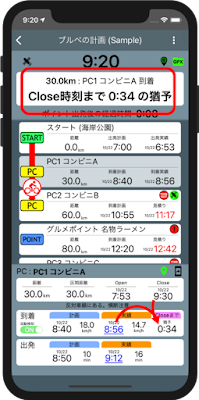
1.6. Save point information as image
When you want to publish your status to SNS etc. on Brevet, it is convenient the function to save point information as image. This is a function to take a screenshot of only the point information part. Tap the screenshot button at the top right of the point information view.

A screenshot of only the point information part is created and can be viewed with a photo app, etc.
You can send it to the SNS app using the sharing function from the photo app.
1.7. Weather forecast
You can use the weather forecast function even during Brevet, and you can get the weather forecast at that time. Please see the weather forecast page for an explanation of the weather forecast function.


2. Useful functions for reviewing
2.1. Modify result
The main function of this screen is to display the contents planned on the planning screen and the time entered on the execution screen as the final result, but some items can be edited here. When you tap "Edit Result" from the menu, the editable items are displayed as blue link characters.

The editable items are as follows.
- title
- Icon image
- Actual arrival time
- Actual departure time
Editing the arrival time and departure time is useful for thinking such as "What would have happened if I had been able to depart at this time?" However, it is an operation that overwrites the original value entered at the time of execution, and once overwritten, the original time cannot be restored. It is recommended to copy the result file itself when editing.
2.2. Others
The "Setting for time difference" and the function to export as an image can be used in the same way as the plan screen and execution screen. You can also get a screenshot of the point information in the same way as the execution screen.

No comments:
Post a Comment
Note: only a member of this blog may post a comment.