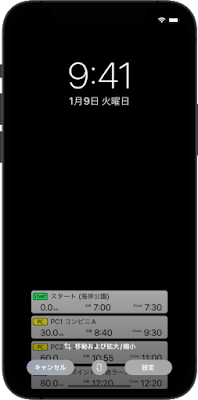
Version 2.5 has a function to generate an image of the plan contents for the lock screen of the smartphone. By displaying the contents of the plan on the lock screen, you can quickly check the arrival plan time and close time of each point.
You can check the Close time even during a short stop time without the hassle of unlocking and displaying the Brevet Manager.
1. Generate an image for the lock screen
2. Set up lock screen in the settings app
3. Image setting and operation
===========================================
1. Generate an image for the lock screen
View the plan view and tap the menu button in the upper right to display the menu. From Version 2.5, a menu called "Generation image for lock screen" has been added. Tap this menu.
The image generation screen is displayed.
There is a button for generation at the bottom of the screen. Tap the capture button at the bottom right. If the save is successful, a dialog to that effect will be displayed.
That's all for the operation on the Brevet Manager. If you check the image on your smartphone with a photo management application etc., you will see that a new image has been added. In the case of iPhone, when you start the Photo app, you can see that the image generated earlier is added.
The actually generated image will be the plan's point list with black margins added to the top, bottom, left, and right. In particular, large margins are provided at the top and bottom.
This is the lock image setting, which is the margin required to move the planning part to the proper position on the screen.
2. Set up lock screen in the settings app
Next, set the generated image on the lock screen of your smartphone. This is done from the settings app on your smartphone, not from the Brevet Manager.
For iPhone, from the settings app
[Wallpaper] → [Select wallpaper] → [All photos]
Select the image generated from. The flow of this menu is for iOS 15.
For Android, from the settings app
[Wallpaper and style] → [Change wallpaper] → [My photo] → [Pictures]
Select the image generated from. The flow of this menu is for android12.
The operations related to wallpaper setting differ depending on the OS type and version. If the procedure differs from the above method, please check the procedure as appropriate. The following explanation will be written using iOS.
When you select an image, the lock screen simulation screen is displayed.
Only a part of the generated image is displayed at the bottom of the screen. This is because the generated image is larger than the screen size. For images larger than the screen size, you can set which part of the image is displayed on the screen on this simulation screen.
The structure of the lock screen differs depending on the OS type and version. Which part of the plan you want to display on which part of the lock screen depends on the lock screen and the plan contents. Therefore, the Brevet Manager outputs an image with a large margin so that the position can be adjusted on the simulation screen.
Swipe or pinch to adjust the position and size of the image so that the plan is displayed in the blank area of the lock screen.
Once you have decided on the right size and location, tap "OK" to set the image. It depends on the type of OS, but it will be difficult to see if it is used as the wallpaper for the home screen, so it is recommended to set it only for the lock screen.
3. Image setting and operation
For long-distance Brevets or plans with a large number of points, the point information may overflow from the screen or overlap with other display contents on the lock screen, making it impossible to see the information.
In Generate Image, you can set which points to include.
Tap the Settings button next to the capture button.
On this screen, you can set "Include all points" or "Include selected points". If you specify a selection, specify its "From" and "To" points. At least one point should be the selection.
Here, the setting includes 7 points from the start.
With this number, everything will be displayed on the screen without going off the screen. With these steps, you can set which point to make an image according to the plan contents and screen size.
In the case of long-distance or multi-day brevets, all information can be obtained by dividing in advance at well-separated points, saving the entire image with multiple images, and replacing the lock screen image at that point. Can be confirmed on the lock screen.


No comments:
Post a Comment
Note: only a member of this blog may post a comment.